Sunday, August 25, 2013

365 Days of Food

The title of this blog was intended to reflect a goal of photographing what I ate for 365 days, as a way of honing my food photography skills.Unfortunately, I still have never finished those 365 posts of food photography.

However, I have just finished keeping track of every single thing I've eaten over the past year, recording my meals in an app called MyFitnessPal. I started on August 20th, 2012 and have recorded everything I've consumed since then.

I started tracking what I ate in order to help me lose weight - my goal was to lose 30 pounds in five months. Using the app to track my food, I met my goal and have lost an additional 10 pounds in the months since. It definitely worked. Losing weight, to me, wasn't a matter of dieting, because I knew that as soon as I completed the diet that I would go back to my old eating habits and put on all the weight again. So I had to completely changed my approach to eating.

And I have a complete record of that change, and I thought it would be interesting to both analyze the data and share it. And even though the original purpose of this blog might not suggest that this is the perfect spot for that, this blog's name says it is.

So here is a summary of everything I've eaten in the past year:


There are several things you'll notice. One, I drink a lot of wine. Two, I have basically given up on sweets. When you change your lifestyle and the way you eat in order to lose - and keep off - weight, you have to make choices. I chose cheese over ice cream and wine over cake.

I still enter everything I eat into the app because I know if I don't, I'll immediately start to slip - an extra piece of pizza here, an extra glass of wine there. Pretty soon, I'll have put on 10 pounds. So it really is a lifestyle change, not a diet.

Tuesday, September 7, 2010

California Apples

2010_0827_254When I'm not doing this food blog, I'm often working for agricultural clients. I few weeks back I had a shoot for the California Apple Commission shooting apple packing facilities in the Central Valley.

I know, I know... California produces apples? Indeed we do, and I was able to see more apples in a single day than most people will see in a lifetime. I love these kinds of shoots because these packing facilities are fascinating places. They handle unimaginable quantities of fruit, and do it very quickly and efficiently.

2010_0827_307At Prima Frutta packing facility (pictured), the apples are floated in water through the bulk of the processing process. This minimizes the handling and potential damage to the fruit, and keeps it clean. And gravity does most of the work of moving the apples through the facility. Pretty smart.

Part of the shoot included getting some 'beauty shots' of the apples, so we took a few boxes of Fuji and gala apples to a corner of the kitchen and set up some lights (see below). It was quick set up, quick shoot, quick tear down, but I think the results were excellent and show off the color and texture of our local apples.

2010_0827_414
Top quality gala apples

2010_0827_445
Fresh Fuji apples

Hey Trader Joe's: Your Doing it Wrong

The day after this shoot, I went into  our local Trader Joe's and noticed that they were selling gala and Fuji apples from Chile and New Zealand! 

Man was I unhappy and disappointed! First, because Trader Joe's positions themselves as a 'green' company, with their reusable shopping bags and granola-crunching clientèle. And second, obviously, because we were harvesting fresh California grown gala and Fuji apples less than a hundred miles away.

They could have been selling fresh-picked, locally grown (and even organic) apples instead of apples that were harvested last February, stored for six months and then shipped literally halfway around the planet! Those Chilean and New Zealand apples weren't fresh, environmentally sustainable, or economically responsible (given how the US and California economies are struggling).

I wish that retailers and consumers would be more aware of where their food comes from and would focus more on buying locally. Here in California, the fate of the agricultural economy is the fate of the state's economy. We have to support our own producers - large and small - if we want to keep our own jobs.

2010_0827_002
California-grown organic gala apples

Lighting 

I brought along three speedlights, lightstands and umbrellas for this shoot, which was conducted in an office at one location, and in a corner of the kitchen at the other location. This allowed for quick set up and take down and provided good lighting for 'beauty shot' closeups of the product.

For the most part I used a three light setup, with the key to the rear and a main fill to the left (1-1.5 stops below the key) and an additional fill to the right, either bounced off the wall or shot through an umbrella (2-3 stops below the key).

This gave me warm, soft lighting, but still provided some nice highlights, particularly on the waxed Fuji apples. I went with three lights because there were a lot of deep shadows between the apples in the trays, and I wanted to get at least a bit of light in there from as many angles as I could.

2010_0827_391

Overall, it was a fun and productive shoot!

Thursday, September 2, 2010

Zucchini Pesto with Spicy Turkey Meatballs

This is probably the eleventy-seventh time we've done pasta for this blog, but I'm OK with that. I could eat pasta every day.

Zucchini Pesto with Spiky Turkey Meatballs

The Food (Jhan)

Over the years Tony has regaled me with his stories of living on a commune in southern California. During that period he grew most of his own food and became quite inventive at finding ways to use his bounty of zucchini. I have always heard so much about the wonderful zucchini pesto he made and canned that I had to make up my own version of this interesting dish.


After a little experimenting I came up with the following recipe for the pesto. Later, I decided that the creaminess of the pesto combined with the al dente pasta could be enhanced by adding spicy meatballs with a crispy outer coating (something for a little crunch) so I made some mini turkey meatballs rolled in panko to add texture to the overall dish. The entire combination created a good combination of flavors and texture.


Zucchini Pesto
  • ½ cup olive oil
  • 2 large cloves garlic crushed and peeled
  • 2-3 regular zucchini chopped
  • ¾ cup fresh basil
  • ½ cup (heaping) toasted walnuts
  • Salt to taste
  • Pasta water as needed to make creamy
  1. Blend garlic, nuts and basil well in food processor or blender
  2. Add zucchini and blend all well – mixture may be a little dry.
  3. Add olive oil in batches to combine all; add salt to taste
  4. In warm skillet combine pesto and ¼ cup pasta water until well blended. 
  5. Add cooked pasta and mix to coat noodles with pesto sauce. 
  6. Add additional pasta water if needed to make a moist and slightly creamy sauce. 
  7. Sprinkle with grated Parmesan if desired.
Spicy Turkey Meatballs
  • ½ lb. ground turkey
  • 1 egg
  • 1-2 tablespoons chopped fresh oregano (This is what really adds the spice to these meatballs)
  • 1-2 tablespoons chopped fresh mint
  • ½ tbsp. dried Italian seasoning
  • Salt and freshly ground pepper
  • 1 large clove garlic
  • ¼- 1/3 cup chopped or grated onion
  • 1/3 cup panko bread crumbs + more for rolling meatballs
  1. Mix all well but don’t over mix.
  2. Form meatballs and roll each in panko to cover all sides. 
  3. Spray meatballs with a little olive oil to help them brown. 
  4. Bake at 425 until internal temp of 165 degrees when measured with an instant read thermometer – about 15-20 min, remove from oven – do not overcook or they will be dry.
Serve the pesto pasta with 3-4 meatballs alongside and a sprinkle of grated Parmesan on top.

Enjoy!

Zucchini Pesto with Spiky Turkey Meatballs

The Plating

I bought this black plate at TJ Maxx and have been eager to use it. I love square plates and I love black plates, and I love the pattern on this plate, so I've been trying to use it every chance I get. I used it for the panzanella salad a couple of weeks back and it really wasn't the right plate for such a rustic dish.

Well, it turns out that pasta isn't much different. Although this looks OK, once again, I don't think this plate matches the food very well. Still, it's a really nice plate - I just need to find the right dish to use it with. The plate is severe, stylish and modern, and it clashes with simple rustic dishes. When Jhan does some fancy sushi we'll use this plate.

Zucchini Pesto with Spiky Turkey Meatballs

The Lighting and Photography

Zucchini Pesto with Spiky Turkey Meatballs Lighting I used lighting very similar to the panzanella salad for this shoot, the only difference being that I removed the fill light bounced off the sheet and only have the key light, shot through the reflector and the soft fill, bounced off the wall and ceiling.

When the dish is backlit (as in the first photo), the focus is on highlights (in this case, off the plate). When side lit, the focus is on textures, since the side lighting brings out the play of light and shadow in  the dish.

Overall, this lighting is OK, but a bit harsh for the dish, which probably would have done better with softer lighting and brighter plating.

Lessons Learned

Repeat after me: match the plate to the food. Rustic plates for rustic dishes. Also, this dish was actually relatively dark with the pesto, so a light colored dish might have worked better.

Monday, August 30, 2010

Farmer's Salad

This is the last post for Tomato Month, and fittingly (given that it's the end of summer), it's a salad. And actually, the tomatoes, as delicious as they've been, aren't really the star of this dish - it's more of an ensemble.

Jhan and I both love farmer's salad; it's a great, fresh and refreshing dish. 

Farmer's Salad

The Food (Jhan)

This is one of my favorite salads. I can't wait for summer to come so I will have beautiful ripe tomatoes and fresh from the garden peppers and cucumbers to use for this recipe. The salad is juicy, refreshing and very tasty.

Farmers Salad is a very hearty salad and can easily become a meal if served with a good quality crusty bread. This salad is also perfect for a very hot day since it requires no cooking and the ingredients can be chopped earlier in the day, refrigerated, and then combined before serving. (You may want to combine the ingredients and the dressing about 30 minutes prior to serving and leave all at room temperature so the flavors will marry nicely.)


This recipe comes from a small cookbook called
Vegetarian Cooking of the Mediterranean by Cornelia Schinharl. 

Ingredients (4 servings)

  • 2 beefsteak tomatoes or 3-4 heirlooms (depending on size) The heirloom varieties add great color and flavor to this salad)
  • 1 cucumber
  • 1 red or torpedo onion
  • 1 bell pepper ( I prefer to use the yellow or orange but red or green are also fine)
  • 8 oz. feta cheese (firm block, not pre -crumbled)
  • 1/3 cup whole kalamata olives
  • handful fresh mint leaves
  • 2 tbsp fresh lemon juice
  • 1/4 cup olive oil
  • 1/2 tsp dried oregano
  • Salt and freshly ground pepper
Wash and dry the vegetables. You can choose to cut the tomatoes and cucumber into bite sized chunks or slice tomatoes and cucumber into wedge or half moon shapes. Slice the onion and pepper into thin slices. Put all into a large bowl. Cut the feta into bite size cubes (not too small, you don't want them to crumble). Wash and dry the mint leaves, tear or cut into pieces and add cheese, olives and mint to bowl of veggies.

In a small bowl mix the lemon juice, olive oil, dried oregano, salt and pepper. Taste for seasonings and add to veggies and cheese, toss lightly and serve.


I like to serve this salad with sliced , untoasted, bread; so tasty when used to sop up the juices from the salad.


Enjoy!
Farmer's Salad

The Plating

I learned a lesson from last week's panzanella salid: rustic dishes need rustic presentations. So for this dish, I went for warm color and rough textures. The simple plate accentuates the simplicity of the dish, the colorful napkin echoes the warm colors of the salad and provides some texture. And the rumpled table cloth adds even more texture. I think this plating was 'mission accomplished'.

Farmer's Salad


The Lighting and Photography

Farmer's Salad LightingEvery week I look at food magazines and blogs and see all the wonderful diffuse window lighting that everyone - everyone but me - uses. I indeed have a window in my studio, but it opens onto the dark space between our house and the neighbor, and with the exception of a few minutes each afternoon, let's in precious little light. I hate that window, and I've been jealous of people with good window light since I started this blog.

The last straw came last week, when my wife and I went to dinner at a local Indian restaurant. When the sun sank below the trees, they opened the window shade at our table, and let in this amazing indirect light that bathed our food in a soft, warm glow.

That was it, I decided. "Goddamn it, I am going to have window light if it kills me." So I bought the biggest piece of foam core I could find (40x60 inches) and cut a nice window in it. Then I stood it up, added another large piece as a 'roof' on the top, stuck a single flash in the window bounced off a sheet, and started shooting.

And you know what? It actually works! I've only used it so far for this one dish, but I'm going to keep experimenting with it until I can consistently get lighting that indistinguishable from natural window lighting.

And yes, I realize that it's kind of a poor man's softbox - in effect if not in appearance. Hey, whatever works. I'm looking forward to a lot of great images shot with this set up!

Farmer's Salad

Lessons Learned

There were a couple of lessons learned here:
  1. Match the plating and presentation to the food. Rustic dished should have rustic plating.
  2. You, too, can have window light, even without windows!

Thursday, August 26, 2010

Panzanella Salad with Heirloom Tomatoes

Welcome to the next installment of Tomato Month here. It's not exactly Shark Week, but you get what you get.  We're continuing to explore the heirloom tomatoes we got from Riperia Farm at the Chico Saturday Farmer's Market. This week, a deconstructed panzanella salad, made using Riperia Farm pink ping pong, jasper, and golden rave tomatoes.

Panzanella Salad

After our communication issues over the plating and presentation of the watermelon salad a few weeks back, Jhan and I decided to carefully plan out and discuss the presentation and plating of this week's panzanella salad. If you do a Google image search for panzanella salad, the first thing you'll discover is how unappetizing most of the images look. Soggy bread chunks and mushy tomato bits may taste great, but they're not appealing to look at, particularly mixed together in a big bowl. We ended up decontructing the dish to make it visually appealing. What we ended up with is, admittedly, more bruschetta than panzanella salad (so sue me - I dare you), but it was a tasty and easy to eat finger food.

The Food (Jhan)

Whatever it looks like, panzanella salad is so delicious, especially with fresh from the garden tomatoes. This salad is healthy, fresh and very filling. (Tony's main request when I mention salad for dinner is always "make sure that it's filling") These heirloom tomatoes were so beautiful, juicy, and sweet!Wow! Such a difference from store bought - go to the farmer's market and get some while they last.

This salad is great for a hot evening because the only cooking involved is toasting the bread, everything else is slicing and dicing. There are a million recipes out there for this salad so I recommend that you use this as a guideline, you could substitute olives or capers for the bacon or add some marinated mushrooms or green beans, replace the basil with fresh mint, etc.

Ingredients (serves 4 - 2 if main dish)
  • 1 1/2 - 2 lbs. fresh ripe heirloom tomatoes
  • Crusty bread 
  • 1/4-1/3 cup olive oil + 2 tbsp.
  • 1 tsp. dried basil (divided)
  • 2 tbsp. red wine vinegar
  • 1 clove garlic minced
  • 1/2 tsp. Dijon mustard
  • Handful fresh basil leaves
  • 1/2 cucumber
  • 3 slices bacon, cooked crisp and crumbled
  • 1/2 small torpedo onion or 1 small red onion
  • Gray salt
  • Pepper
  • Parmesan cheese
Bread/croutons
  1. Preheat oven to 350 (or use the toaster oven)
  2. Slice bread and cut into halves or chunks (traditionally the bread should be in chunks but using slices can make this easy summer dish into "finger food") 
  3. Pour 2 tbsp. olive oil into a skillet, add garlic and 1/2 tsp. dried basil (crush in your palm to powder) 
  4. Heat oil mix to just cook garlic
  5. Add bread, coat with oil mixture, sprinkle with finely grated Parmesan
  6. Arrange bread on baking sheet, bake 20-25 minutes until lightly toasted
Vinaigrette
  1. Mix olive oil, vinegar, 1/2tsp. dried basil, mustard, pinch of salt and freshly ground pepper until combined, set aside
Salad
  1. Cut tomatoes into bite sized chunks, put in bowl 
  2. Cut cucumber half length wise and them cut into quarters, add to bowl with tomatoes 
  3. Slice torpedo onion into thin 1/2 moon shapes, separate slices and add to bowl with vegetables 
  4. Tear basil leaves into small pieces , add to veggie bowl, toss all to combine 
  5. Add crumbled bacon pieces to bowl 
  6. Add bread chunks (or arrange toasted slices on salad plates) 
  7. Pour vinaigrette over all and toss lightly (if using toast, arrange tomato mix between toasts and drizzle dressing over veggie mix and toasts) 
  8. Sprinkle gray salt lightly over salad with a few grinds of pepper and serve 
  9. Optional: Grate Parmesan over salad
Enjoy!

Panzanella Salad

The Plating

Though I think these photos came out great, my one regret with this shoot was the plating. Not the way we put the dish together, but the plate and background I used. I like black on black because it brings out the color in food, and that's certainly the case here. But the modern plate and the black background really aren't that appropriate for such a simple and rustic (there's that word again) dish. That's my opinion after the fact anyway. But I had just bought this cool black plate at T.J. Maxx ($2.99 or some such), and I was dieing to use it. So I did.

However, I do like the presentation of the dish. When I looked at images of panzanella salad on Google, I was horrified by the mishmash of mushy tomatoes and soggy croutons. Not pretty to look at. My first thought was that - for the camera - we had to deconstruct the dish to make it appealing to look at. Jhan understood that as well, so we spent a lot of time talking about how best to do that. The communication process was good, but what we're learning is that you never really know how a dish is going to look until you start plating it.

The Lighting and Photography

Panzanella Salad & Margherita Pizza LightingFor this shoot, I wanted some highly directional lighting with a soft fill so that I could shoot with the key light behind the dish, but still get a lot of detail in the food. So I put the key light very low and close, and shot through a reflector. I bounced a fill light off the ceiling (since I was standing at the right side of this photo when taking pictures, the fill light was coming from above and behind me). I also added another fill to the right, bounced off a sheet. The key light was 1.5 to 2 stops brighter than the fills.

Overall, I think this worked very well.

Panzanella Salad

Lessons Learned

I think the biggest lesson learned here was how to communicate on coming up with ideas to visually remake a dish. I didn't have any preconceived notions about how panzanella salad should look, other than it needed to look appealing. Jhan was flexible in the preparation so that we got something attractive and tasty. But the biggest lesson was that you just never really know how a dish is going to look until you start plating it.

Panzanella Salad

Monday, August 23, 2010

Margherita Pizza

This is Tomato Month, and for the next few posts we'll be using those wonderful tomatoes we got from Riperia Farm in our dishes. If you don't like tomatoes, then, well, you're out of luck for the next couple of weeks. 

We start off Tomato Month with a margherita pizza made using some incredibly sweet brandywine tomatoes. It was yummy!

Margherita Pizza

The Food (Jhan)

We haven't done any pizzas lately so I thought we should make one with our lovely tomatoes. This is my version of pizza Margherita - one of my favorite pizzas. This one has it all; sweet roasted tomatoes, smooth creamy ricotta, chewy mozzarella, fresh herbs and a crispy crust. Since our summer weather has been cooler than usual, turning on the oven for a few minutes to bake this wasn't a big deal. This pizza is simple, requires only a handful of ingredients, and the results are incredible.

You'll need a good store bought pizza dough (I use Trader Joe's fresh Rosemary dough), about 1/4 cup of tomato paste, some dried basil, garlic salt, a handful of fresh basil, one large beefsteak tomato, ricotta cheese, 1 cup of grated mozzarella cheese, 1/4 cup slivered kalamata olives, kosher salt and olive oil.

Prepare the dough as directed on the package. Spread the tomato paste onto pizza crust and sprinkle with dried basil and garlic salt. Dollop generous spoonfuls of ricotta onto prepared crust, sprinkle with slivered olives, drop mozzarella over all and add tomato slices (seed the tomatoes to prevent a soggy crust). Drizzle pizza with a little olive oil (especially over the tomatoes) and and brush oil over edges of crust. Sprinkle edges with course salt. Bake pizza at 450 degrees until cheese is browned and crust is baked ( about 8-12 minutes). Add fresh basil leaves to finished pizza.

Enjoy!

Margherita Pizza

The Plating

Jhan's first comment when she saw the photos from this shoot was "Don't you ever even think of putting those raggedly old potholders in a photo again. They're disgusting and embarrassing." And I thought they looked 'rustic'.

And that was kind of what I was looking for in the setup. Margherita pizza is a simple, rustic sort of dish. Nothing fancy or haute cuisine, and I wanted to reflect that. So I put the whole pizza on our beat up wooden cutting board with the 'rustic' potholder to add a bit of texture.

The Lighting and Photography

For some reason, I didn't take a photo of the lighting I used for the pizza, but it was very similar to one of the set up I used in the previous post, with the key light bounced off a sheet and a small bit of fill shot through a reflector and another small bit of general fill bounced off the ceiling.

Lessons Learned
There was nothing really challenging in this shoot as far as the lighting. I did, however, learn that fresh basil rapidly turns brown when it gets hot, so I had to replace the basil on the pizza when I started taking pictures to make sure that the leaves were green. As it was, some of the leaves are showing bits of brown on them.

Also, I think Jhan's tip about seeding the tomatoes to prevent the pizza from getting soggy is very important. Tomatoes contain a lot of water in the seedy pulp, and removing that part of the tomato will help prevent a soggy pizza. And nobody likes soggy pizza.

Margherita Pizza

Monday, August 16, 2010

Heirloom Tomatoes from Riperia Farm

We're still having a lot of fun getting to the Chico Farmer's Market every Saturday morning at 8AM. But I'm sure the allure will wear off eventually. But I have to say, we've gotten some delicious stuff there... but it ain't cheap. This weekend, we spent $50 (!!) on heirloom tomatoes, organic peaches, and a grass fed chicken (well, and a bagel too).

Heirloom Tomatoes at the Riperia Farm booth

Pricey! But worth it. Store bought peaches and tomatoes are nothing but mealy cardboard next to what we get at the farmer's market.

Bruce Balgooyen of Riperia Farm
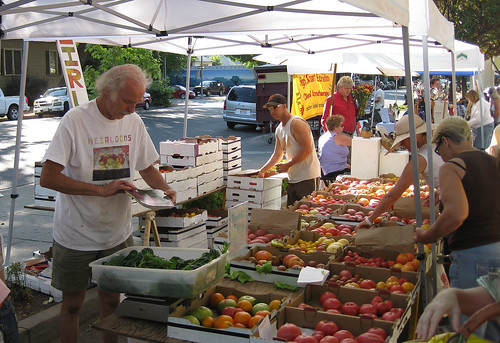
This weekend, we bought a whole variety of heirloom tomatoes from Riparia Farm, located at the south end of Chico. Bruce Balgooyen walked us through the over 40 varieties of heirloom tomatoes he's been growing at Riperia Farm since 1987, but even he couldn't remember every one of the amazing variety of tomatoes at their booth in the farmer's market.

Riperia Farm, located at the south end of Normal Street, specializes in lettuce and heirloom tomatoes, and it was their amazing display of variety upon variety of colorful heirloom tomatoes at their booth at the farmer's market that made me want to highlight them in our blog. Besides, heirloom tomatoes are out of this world flavor-wise!

The Riperia Farm Booth

Lighting and Photography

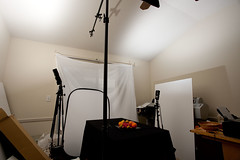
Before we started butchering these gorgeous tomatoes for various dishes, I wanted to make sure to capture them in their natural beauty, so I set up shop in my studio (which drives me insane to work in if I haven't mentioned it before - it's like working in a telephone booth, it's so small).

Shot 1

Heirloom Tomatoes from Riperia Farm
Click on the image to see the varieties

Heirloom Tomato Lighting
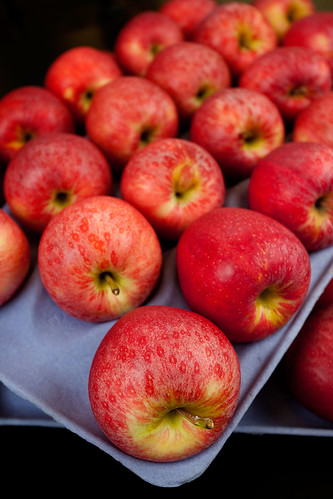
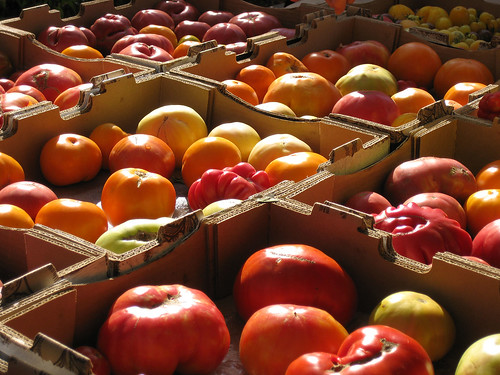
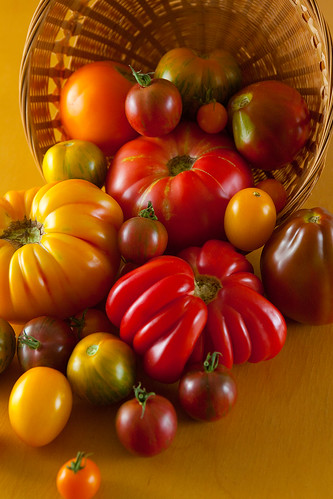
I wanted to capture the tomatoes against different backgrounds to see what effect they would have on the color and texture of the tomatoes, so I started with the bare wood of my table, and a wicker basket to create a sort of cornucopia shot of the tomatoes.

This actually worked out amazingly well. I placed the key light, low, close and to the left, with fills to the right (bounced off foam core at 1/4 power of the key, and a distant front fill, also at a 1/4 power. This third light did very little other than to fill in the shadows deep inside the wicker basket. Overall, I rate this set up a success, though the colors might be seen as a bit warm, even after correction.
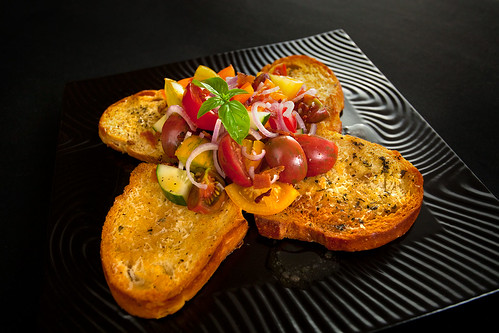
Shot 2 - On Black

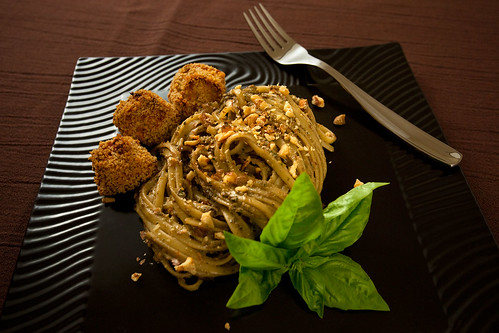
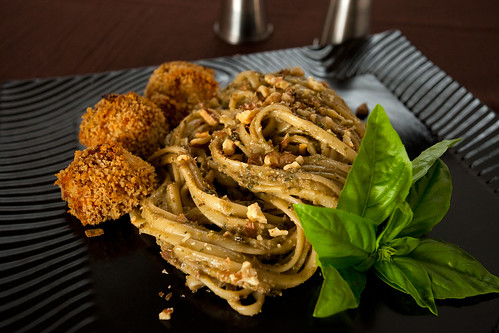
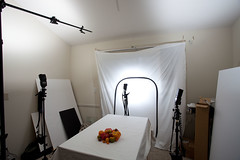
Next, I tried the tomatoes against a black background.

Heirloom Tomatoes

Heirloom Tomato LightingI knew the black would bring out the colors of the tomatoes, so I decided to go with a very diffused, even lighting to eliminate shadows and to pump up the saturation in the image. So, I pointed both flashes at the ceiling, the key light (on the left) 1.5 stops brighter than the fill light (on the right).

I find the soft lighting very pleasing and it does saturate the colors of the tomatoes. I also like how the ripples on the plate come out in this lighting. Overall, I think this was the best set up of the bunch.
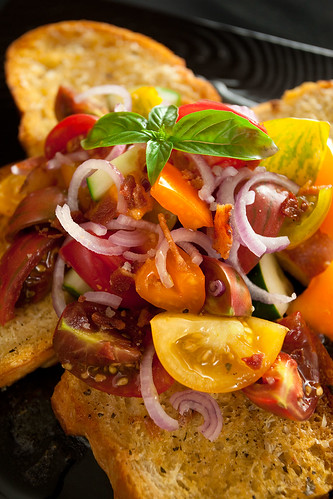
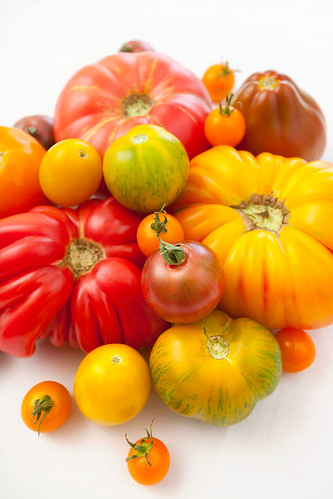
Shot 3 - On White

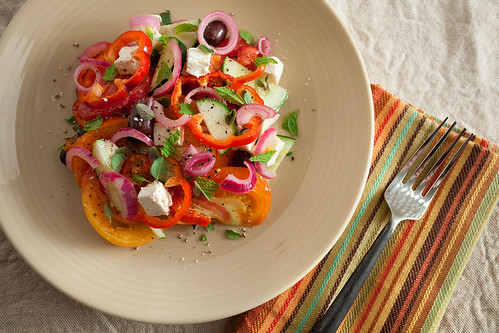
Lastly, I decided to go to the opposite end of the spectrum and put the tomatoes on a white background.

Heirloom Tomatoes from Riperia Farm


Heirloom Tomato LightingI tried a couple of different plates, but none were really big enough to handle a huge pile of tomatoes. So, they just ended up on a white sheet. The lighting was basically the same as for the previous shot, but I added a third flash, bounced off a reflector, toward the rear to give me a little extra sheen off the tomatoes and to blow out the white sheet. Although this shot is OK, if I were to do it over again, I would have gone for more intense shadows by moving the key light down to the level of the tomatoes and shooting it through a reflector, similar to the first shot.

Lessons Learned
  1. Black backgrounds accentuate the color in food, and as a result soft, shadowless lighting can be effective.
  2. White backgrounds focus more on the texture of food, and as a result harder lighting with well defined shadows is more effective.
Next week: Panzanella salad made with heirloom tomatoes!