Well, we've been gone forever. Pretty lame-o, I know. But Jhan's schedule got insane last semester as she started teaching evening classes for the local community college. With her regular day teaching job, along with her afternoon community college class and the teacher trainings she does, she was too exhausted to cook - much less write blog posts about it. So we pretty much suspended the blog for the last half of the semester.
Of course, she's going to go back to pretty much the same schedule this semester, so posts may be few and far between. For the one or two people who read this blog, I apologize.
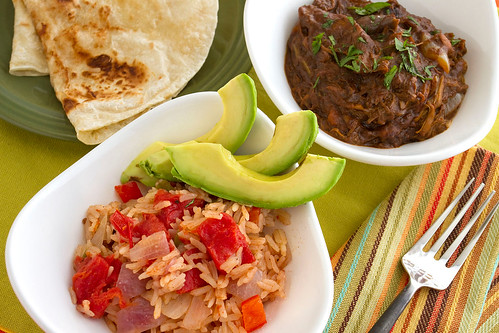
Anyway, we did make something and shot it! Chicken mole! Of course, as usual, what Jhan made and what I envisioned she was making were two different things. I was thinking of the pollo en mole that I've had many times in Mexican restaurants - basically a piece of chicken covered in dark mole sauce.
Instead, Jhan shredded the chicken and mixed it into the sauce. It was delicious, but a dark brown mass of goo with bits of something in it isn't exactly photogenic. As a result, I ended up kind of ignoring the mole, and focused on the rice and avocado instead.
The Food (Jhan)
Believe it or not there really were chunks of chicken in the mole sauce! True, I was planning on mole to fill soft tacos, not plates of chicken pieces with mole sauce and rice, thus the shredded chicken. In any case it was delicious.
For this dish I used a bottled mole sauce with a few enhancements, but I think the real secret is in cooking the chicken prior to simmering it in the sauce. I have always made a spicy chicken soup first. That way I have great chicken stock to use with the mole paste and I also have very flavorful chicken to soak up the mole once the two are combined.
For the soup I use a variety of dark and light meat, bone-in, chicken, a bay leaf, a couple cloves of smashed garlic, a yellow onion quartered, a rough chopped carrot, a couple stalks of celery with leaves attached, a chopped jalapeno pepper, salt, whole peppercorns, cumin and a little cayenne. I sauted all in the soup pot with a little olive oil and then added water and cooked until chicken was tender and falling off the bone.
When the chicken was ready, pulled it out of the soup and cooled until it could be handled. At this point it can be de-boned, skinned and shredded or can be used whole (note: if your husband is taking pictures of the food this is a good point to ask about his "vision" of what it will look like :)). Next, strain the stock and pick out any chunks of carrot to use in the mole sauce. For the sauce I chop red onion, a clove of garlic, some fresh jalapeno and cilantro.
I lightly saute these in a deep frying pan or wok and then add the mole paste and chicken stock. Stir all until well blended - you may need more stock or some water to get the sauce to the consistency you desire. I check the seasonings and usually add more spices or salt if needed and any carrot chunks left from the soup. You can also add pumpkin seeds or sesame seeds if you like. I put the chicken in last and then simmer briefly until the flavors have blended. Sprinkle with chopped fresh cilantro when serving.
Mole is best if prepared a day in advance, refrigerated for 24 hours and then gently reheated.
The Plating
As I said, I was expecting a completely different dish than the one Jhan created. As well as we communicate on other things, we both make odd assumptions when it comes to preparing food for the blog. She knows in her mind what she wants to make, but doesn't always have a great appreciation of how photogenic it will be, and thus doesn't always communicate the salient characteristics of the dish. I, on the other hand, often assume that a dish will look one way, when in fact Jhan has something completely different planned. We are still working on this.
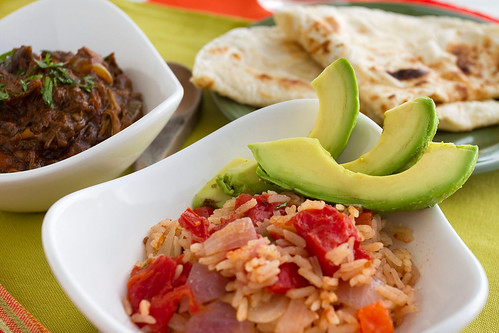
Ending up with a big brown blob was not what I had envisioned, so I had to be a bit creative and decided to re-focus the photography on the simple but beautiful Mexican rice Jhan made. I sliced up some avocado to provide a bit of color contrast to the red tones of the rice, and plated the rice and mole into bowls. I used colorful place mats and napkins to highlight the festive colors of the rice and avocado.
The Lighting and Photography
Given that this was Mexican food, I opened a bottle of Tecate beer and placed it next to the bowls for the shoot. The piece of white foam core that I was using as a reflector promptly fell over and knocked over the bottle of beer all over the table, a large reflector, the tablecloth and the carpet.
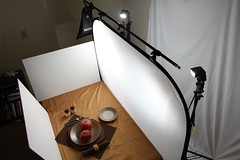
Great way to start the shoot. After cleaning that yeasty mess up (my studio still smells faintly of a frat party), I was able to do the shoot, but I did forget to take photos of the lighting.
However, the general set up was as follows: Large reflector to the right of the dish, with two flashes (one slighting behind the dish, one slightly in front). The white beer-spilling foam core reflector was to the left of the dish. One flash was aimed at and bounced off the ceiling directly above the dish (1 stop lower power than the lights to the right).
The ceiling bounced fill gave me a pretty even light and filled in the deepest areas in the bowls.
I had to do major Photoshop surgery on the avocados because they were pretty bruised and battered, but they came out looking acceptable. It is very interesting how something can look OK in person but stand out horribly in a photograph. The avocados were like that; though they didn't look perfect in person, they looked almost inedible in the photos before I cleaned them up in Photoshop.
Lessons Learned
This shoot came out pretty good despite the spilled beer and the bowl of brown goo. I like the color combinations and felt that I did a pretty good job of combining appropriate colors.
What I learned on this shoot is that sometimes, when a dish doesn't come out looking photogenic, you have to change course at the last minute and make a secondary dish the 'hero' of the shoot. The rice looked good, but it needed something to turn it into the center of attention - the sliced avocado (bruised as it was) did the job - with a little help from Photoshop.