Well, Jhan has been wanting to make bread for quite a while, but with her damaged wrist, all the kneading is a real challenge. But the new knead-free bread book she got has let her start exploring her inner baker.
Photographically, these loaves were beautiful, but this particular bread-making technique produces crusts that a bit too... well, crusty for me.

Food (Jhan)
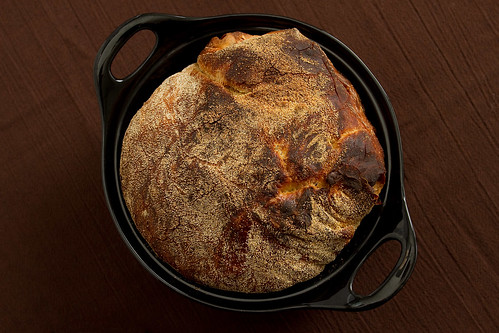
I've had Jim Lahey's My Bread on my Amazon wish list since June and even with all of the gift giving of the holidays did not receive it. I gave in and bought it for myself last week and this bread is my first attempt at making Lahey's basic bread recipe.
In my "Hippie" past I used to make 2 loaves of whole wheat bread every week for the family. I loved making bread and the wonderful smell of fresh baked bread in the house... but I hated the kneading, the fussy yeast cakes, and trying to find just the right temperature for the dough to rise. Needless to say I had my share of failures over the few years that I endeavored to provide fresh, homemade bread for my family - so I was delighted to hear about a "foolproof" no knead bread recipe.
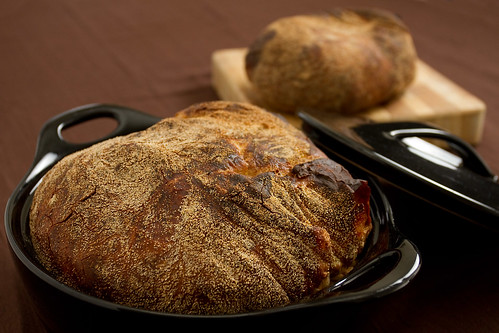
Overall, I was pretty pleased with the results of my first try. The method is sooo easy, and even in our freezing cold (eds note: 68° F) house the dough rose beautifully. The dough had a wonderful silky quality when it was ready to be shaped, it does remain quite sticky though even with a dusting of cornmeal. I didn't have a large enough pan to bake the entire boule in, so I cut off about I third of the dough and baked the bread in two loaves.
I didn't notice any real difference between the loaf baked in the cast iron casserole and the loaf baked in the ceramic casserole; both of them had a nicely browned crust. The interior of the bread reminds me of sourdough in that it's chewy and "airy" with a nice flavor - great! But the crust was a bit too crunchy for us - next time I'll probably put a small amount of butter on the crust as it cools, not a lot, but just some to soften up the top crust enough to cut or bite into comfortably. This bread is great to eat warm with a little butter, or to sop up soup or stew. And as bruschetta or maybe with cheese, salami, fresh basil and a good mustard, it would be fantastic!
This was a great experience and I can't wait to try more of the recipes in My Bread.

Plating
Plating was simple for this shoot - the loaves were baked in pans, so I just left one loaf in its pan and put the other, smaller, loaf on a wooden cutting board. I wanted warm, homey, earthy tones, so I went with a brown table cloth.
Other than the cutting board and the one pan, there is nothing else in the shots. Because it's a simple subject, a loaf of bread could easily be overshadowed by plates, knives and other objects in the photo. I made sure to keep the images clean and simple by eliminating everything except the bread and whatever was needed to support it. That approach worked well in this particular shoot.
Lighting and Photography
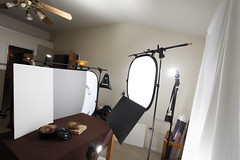
The lighting for this shoot was fairly straightforward: key light to the right of the bread, bounced off white sheet; fill light to rear of bread, shoot through a reflector; second fill bounced off ceiling to provide soft, even fill light.
This light, so similar to that I used an hour later for another shoot, worked wonderfully here, creating warm soft tones in all of the photos. But virtually identical lighting didn't work so well in the following shoot. It's still a mystery why one lighting will work so well with one subject and create such a horrible lighting mess with another subject.
I 'm beginning to think that it has a lot to do with the tonal quality of the background (typically the table cloth) in the images. As usual, I'm still having better results with dark backgrounds than with lighter backgrounds. However, I have started to get smarter about manipulating my exposures than I was before. I'm still relying on the wireless flash transmitter to control the remote flashes, but I'm using a combination of flash ratios and on-camera flash exposure adjustments to better handle overall exposures. However, I need to start paying more attention to histograms in order to make sure that the exposures are correct.
Lessons Learned
Use on-camera flash exposure compensation to assist in obtaining the best exposure, since the best exposure can change dramatically by moving only a few inches.
No comments:
Post a Comment