My biggest complaint about pot roast is that it can be dry, dry, dry. But this one was tender and juicy and tasty - about as perfect as a pot roast can be. The other big plus of this pot roast: it filled the house with delicious smells all day.
Food (Jhan)
I made this pot roast in the slow cooker and I just used what I had in the house. This is the easiest recipe ever and the result is a tender moist roast with a great gravy base.
Start with a 3-4 pound chuck roast that has had the fat trimmed from it. Marinate the roast in one bottle of nice red wine (choose something that you would like to drink), 3-4 crushed garlic cloves,and 2-3 bay leaves (use fresh if you can find them). Marinate overnight.
The next day, roughly chop one large onion and drain the roast and pat dry, reserve marinade. Heat some EVOO in a pan, saute onion until tender and just beginning to brown, remove to slow cooker. Add more oil to pan if needed and sear roast well on all sides , about 2-3 minutes each side.
Put roast into the slow cooker on top of the onions. Season roast with kosher salt and cracked pepper. Add about 1/2 cup of the reserved marinade (pull out the garlic and bay leaves) and 2/3 cup water to the the skillet. Bring to a rolling boil, stirring to scrape up the browned bits. Boil until reduced by 1/2 , pour over pot roast. Cook on high in slow cooker for about 3 1/2 to 4 hours.
This can be cooked (covered) in a 300 degree oven until it reaches an internal temperature of about 160 degrees. Drain the onions to serve with the roast and use the remaining juices to make a light gravy.
Plating
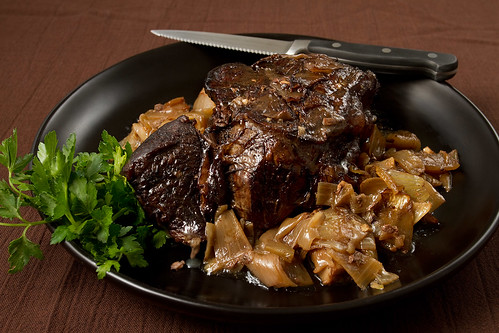
Jhan and I discussed the plate to put the pot roast on, and though I initially gravitated toward a fancy plate that I've been itching to use, Jhan's comment was "too fancy". That put the proper perspective on the dish - pot roast is down home cookin', and it don't need no fancy-dancy plates.
So I went with your basic black platter, though I knew that a dark plate might fight with the dark meat. But my real goal was to try to bring our the highlights in the dish, and knew that a dark plate and dark background would help.
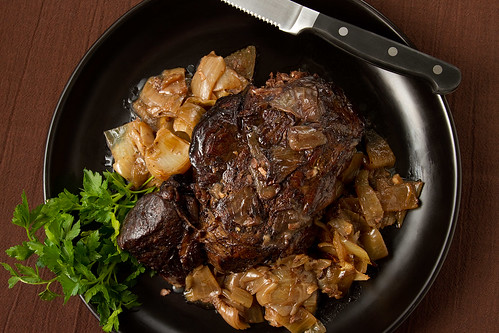
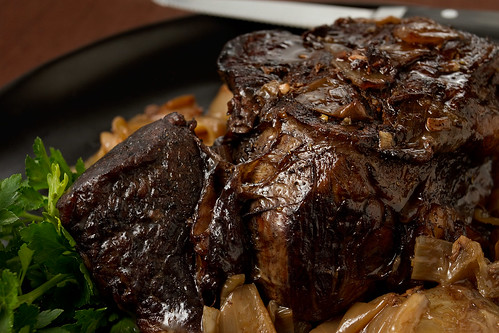
The meat had already finished cooking and was cooling on the counter when I started the shoot. As a result, it looked pretty dull and dry. So I basted the meat with some of the juice in the bottom of the slow cooker and added some parsley to the plate for color. Overall, I think it looks quite appetizing.
Lighting and Photography
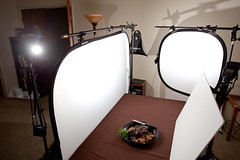
I wanted to get a lot of juicy reflections off the meat, so I experimented with placing the key light to the rear. That resulted in really overwhelming reflections that didn't work at all (see image below).
So I had to switch the key light to the left side and had to tone down the rear light to only 1/4 or 1/8th power of the key light in order to keep the reflections from being overpowering. I added the white foam core to fill in right-front areas of the dish.
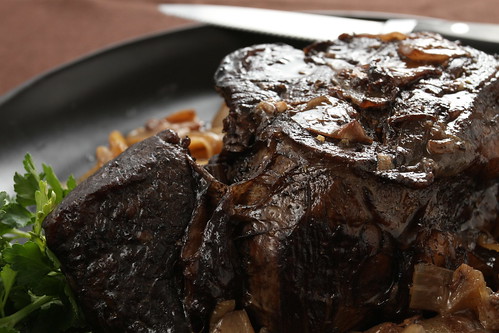
The key light provided some nice juicy highlights on the front areas of the dish (see the reflections on the meant, onions, and front edge of the plate below), while the rear fill provided some nice, but not overpowering, reflections on the top of the meat, as well as a bit of shine on the knife blade. The reflector on the right helped keep the right side of the dish from being too dark.

Lessons Learned
This dish turn out to be that challenging to photograph, but I did learn that controlling reflections and getting the kinds of reflections you want isn't as simple as you might think. I ended up adjusting light levels dramatically, as well as moving lights, in order to get the effect that I wanted.
that's great
ReplyDelete